Things here have been a bit more active than usual. The mere existence of a second car around the MysticSpiral homestead has Sprout in a frenzy of "What will we do next?!?!" That said, the fact that we have the option to leave whenever we wish has her a little more content to linger around the house playing in nothing but her underwear. (What is it about young children that prompts them to be nudists?) We are planning to enroll Sprout in preschool in the fall, but may put her into preschool day camp for a couple of weeks in July and/or August to start getting her used to the idea. We have been taking a break from swim lessons because it was just too hard to work out the schedule for 4-day-a-week swim lessons with just one car.
But it's not just about Sprout's activities and options. I also have a chance now to do things that I felt I couldn't when we were a single car family. I'm indulging some activist impulses that were dishearteningly problematic as a single car family when K's schedule can sometimes change with no notice. I'm also getting back to water aerobics and, hopefully starting this week, middle-eastern dance.
I worked some on the promised finger puppet tutorial while I was in Cincinnati. I've got pictures on the data card on my camera. I've got notes for the actual text handwritten in the spiral bound notebook that I usually take with me everywhere. Most of the notes were written sitting in the car in the driveway the day we bought Rosie. (I had foolishly neglected to check whether I had my complete key ring and instead only had the ring with the Y keyfobs and the locker key. I got to spend a couple hours hanging out in the car getting to know her since I was locked out of the house.) Unfortunately, I'm experiencing computer problems and at the moment my system lacks image editing software or any kind of word processing program. I could probably write the tutorial up in WordPad, if I had to, but I'd rather not.
I have an appointment with my prescribing psychiatrist in just over a week to discuss the addition we made to my meds last month. All in all, I'd have to say that the change has been positive. I feel much more engaged in my own life now than I have in quite a while. Since I mentioned activism earlier, I feel the need to mention something that touches on both my need to promote the causes nearest to me and my own illness.
Like it or not, there is a stigma associated with depression. One part of the reason that I have chosen to be so candid here about my mental health issues. Depression is an illness. It is not a defect. It is not something to be ashamed of. That said, there are many people who refuse treatment for their depression because the cannot see beyond the stigma of mental illness. "What if my employer / landlord / parents / children / competitors / etc find out?!?" This is one of the reasons that the Kristin Brooks Hope Center and its national 1-800-SUICIDE hotline are so important. As an privately funded service, they are not required to report, or even collect, any personal information on anyone who calls. They rely on the support and donations of people just like us to keep providing confidential services to those who need them.
Showing posts with label tutorial. Show all posts
Showing posts with label tutorial. Show all posts
29 June 2008


12 June 2008
Another Minute of Fame
 Andy Warhol's quip about 15 minutes of fame comes to mind every time I see my name in print. My own 15 minutes seems to take the form of 10 seconds here, a minute and a half there. In November of 1994, I managed to track down and post the portion of the US Armed Forces Military Chaplain's Manual of Religious Requirements and Practices that pertained to the practice of Wicca; Witchcraft. For a number of years, probably until the relevant materials were revised in 2001, I would occasionally run into someone who knew my name in association with that document. I met several people who had used the document to support their religious freedom in custody hearings and anti-discrimination suits and who said that it made a real difference for them. At this point, it takes a bit of digging in a search engine to connect those dots and it's not something that I bring up on a regular basis.
My fame in the field of ceramics is based on a bit more history. Whether it's posts on the CLAYART email list, links to the handbuilding lessons that I wrote and posted on my website, ceramic beadmaking techniques and firing information, the article that I wrote for Pottery Making Illustrated, or the tips that I've submitted to Ceramics Monthly, I have a reasonably high profile.
I'm contacted frequently by people who are interested in using my written materials in one way or another. I've received email from teachers in Europe, South-east Asia, South America and throughout North America asking for permission to use the handbuilding lessons in schools, rehab facilities, prisons, community centers and home school environments. I'm thrilled to know how people will be using these lessons and to know that the material is out there helping people. I almost universally approve the use of the lessons for teaching purposes and have only ever denied someone who wanted to combine them with other materials for sale on a CD-rom.
That article from Pottery Making Illustrated, on the other hand, has been reprinted by the American Ceramic Society in the book Pottery Making Techniques: A Pottery Making Illustrated Handbook and again on their website as part of their Ceramics Daily Feature. These reprints have come as surprises to me and as such I have mixed feelings. I found out about the book because I saw it at NCECA the spring following its publication. I found out about the Ceramics Daily reprint because it popped up in a google alert. (As an artist, I have several search notifiers set up so that I'm notified when new information about me is archived in Google's search database.) Sure, the reprints are good and keeping that information in front of people can only help my name recognition, etc. On the other hand, it would be nice if a publisher were kind enough to contact the authors whose work they were reprinting and let them know what's going on. Afterall, I feel like a complete idiot when someone says, "Congratulations, I saw your ______ on the web." and my response is "Huh?!?! Where? When? Are you sure?"
18 November 2007
My new spindling book
Ok, maybe that's deceptive. It's not like I've written a book on spindle spinning. Instead, I've turned a small, otherwise useless book into a drop spindle. I found the book at the annual Planned Parenthood book sale held at our local fairgrounds. I had fun making it and am thinking about doing a tutorial, if there's any interest.
I've been doing a lot of spinning recently. Between that and the sweaters that I've unraveled, my yarn stash is getting out of control. It doesn't help that I haven't been doing any knitting or anything with the yarn. I'm currently taking my first uneasy steps toward using some of the incoming yarn.
A series of sock tutorials is being posted on Lime & Violet's Daily Chum. I'm working through the first tutorial using yarn reclaimed from a Gap sweater in a truly unfortunate color. There are 4 skeins total and I'll probably overdye the other 3 but I was so anxious to get started knitting my first pair of socks that I decided to jump right in with the eye-poking really should glow-in-the-dark yellowish greenish yarn exactly as it came off the hanger after washing and blocking.
The only down side to spending time over at the Daily Chum is that if I hadn't stopped by I would have been blissfully unaware of this.

I've been doing a lot of spinning recently. Between that and the sweaters that I've unraveled, my yarn stash is getting out of control. It doesn't help that I haven't been doing any knitting or anything with the yarn. I'm currently taking my first uneasy steps toward using some of the incoming yarn.
A series of sock tutorials is being posted on Lime & Violet's Daily Chum. I'm working through the first tutorial using yarn reclaimed from a Gap sweater in a truly unfortunate color. There are 4 skeins total and I'll probably overdye the other 3 but I was so anxious to get started knitting my first pair of socks that I decided to jump right in with the eye-poking really should glow-in-the-dark yellowish greenish yarn exactly as it came off the hanger after washing and blocking.
The only down side to spending time over at the Daily Chum is that if I hadn't stopped by I would have been blissfully unaware of this.
15 September 2006
Whiplash: Needle Felt Embellished Hat Entry
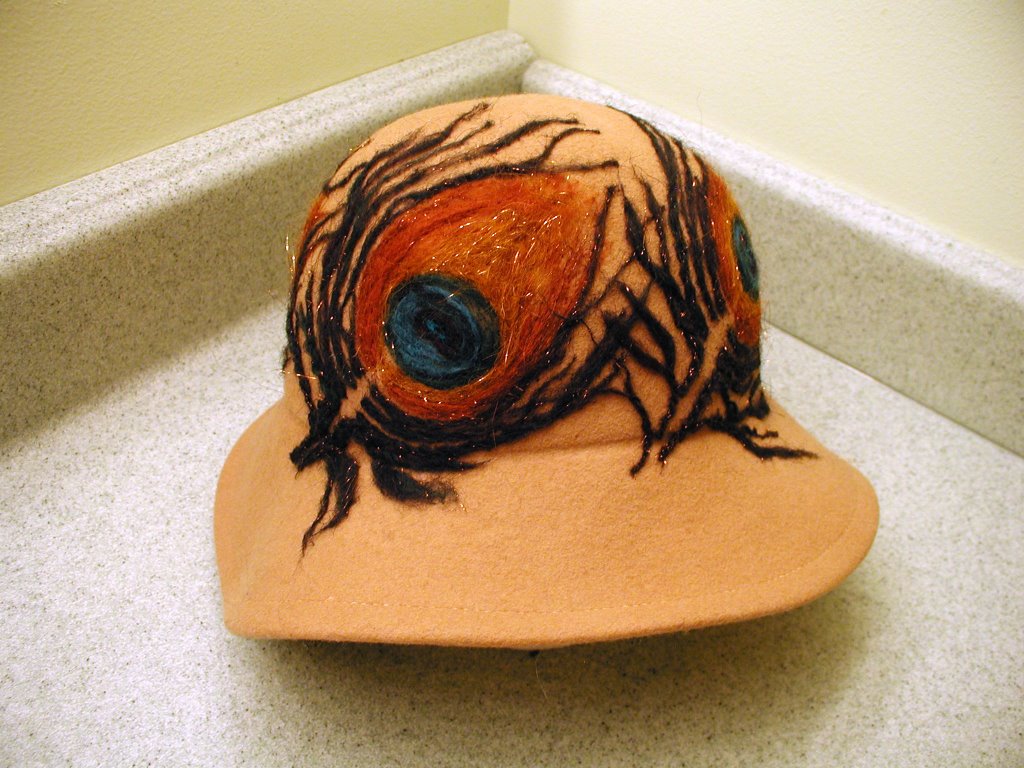
 This is my first time actually trying to enter Whiplash. I'm not sure if which ring of the competition to throw it into. It's also my first attempt at a needle felting tutorial. The first step, of course, was to obtain a hat. This one was a $1 find at my local thrift shop. The hat was in mostly good condition but had a minor stain and a couple of small holes, presumably from someone attaching a pin to decorate the hat. For my purposes, none of those defects really mattered. (Unfortunately, I neglected to take any pictures of the hat before I started embellishing.)
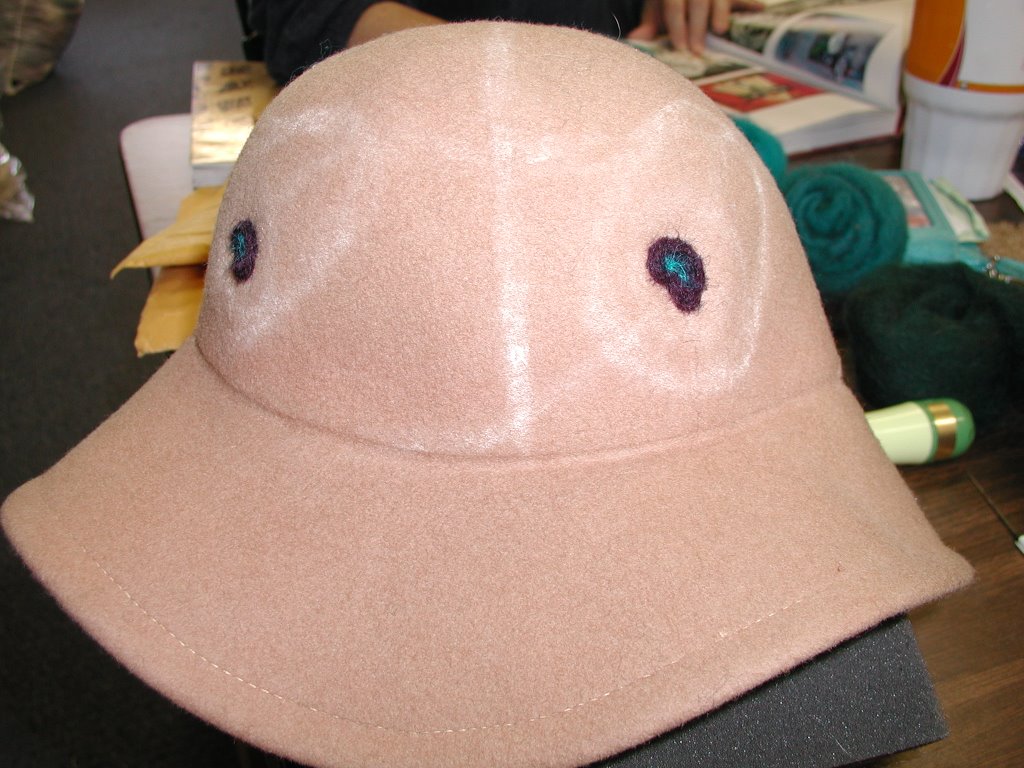 After figuring out what motif I wanted to use to decorate my thriftshop find, I located the defects on the hat that I wanted to hide. I sketched my design onto the hat using chalk, placing the eyes of the peacock feathers over the holes that I wanted to felt over. I selected colors of corriedale roving needed to complete my design and began filling in the eyes of the feathers as though coloring a paint by number. I found that the chalk outlines disappeared rather quickly once I started the actual felting process. That didn't really matter much, however, because the lines were only intended as a guide for placement of the eyes and the rest of the feather was built more or less free-form around the eyes.
 Once the eyes were finished, I decided that the hat needed a bit more glitz. for the remainder of the feathers, angelina fibers were carded into the roving to add sparkle to the finished project. This picture shows the hat with the blended rolags of the two brownish tones that I selected for the tops of the feathers. In the foreground you can see the clover multi-needle punch and a single needle that I used to attach the fiber to the hat. For tacking fibers in place, I generally keep one or two felting needles in each size with a self-adhesive label wrapped around the top. On this lable, I can write the size and shape of the needle so that I can tell at a glance which needle I'm reaching for. Many manufacturers color code their felting needles, but I can never seem to remember which color corresponds to which size/shape.
 I also selected several colors from the eye of the feather and carded them together with the angelina fibers for the "fronds" of the feathers. I hoped that by blending the colors, I would be able to mimic the irridescence of the play of colors on the feathers. To make the fronds, I started by pulling out thin tufts of the blended fiber and rolling it between my hands to make a thin snake. I then arranged those snakes into the pattern that I wanted. After some experimentation, I also found that I could spin (I needed the practice drafting on my spinning wheel) a thick/thin single which I could then pull apart in the lengths that I wanted. Since my spinning is still a bit rough, the overtwisted lengths of fiber kinked back on themselves in a way that I found pleasing and felt contributed to the overall design.
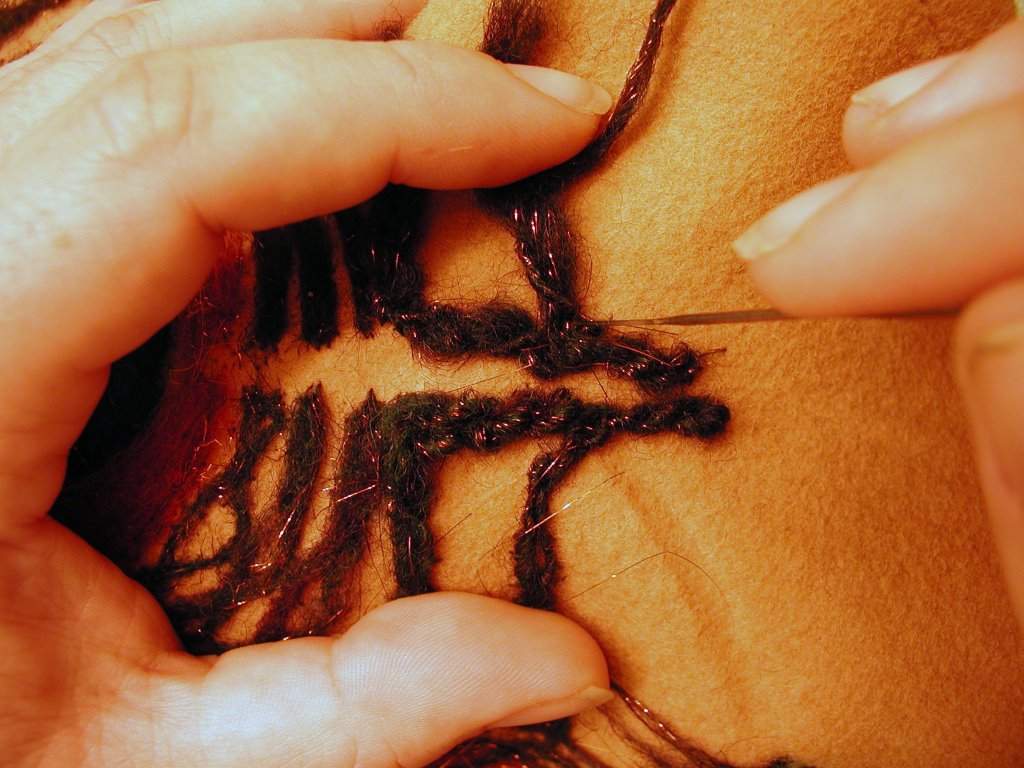 For those not familiar with needle felt embellishment, you begin by arranging the fibers onto the base fabric. It's a little like painting with the fiber. Once you're pleased with the arrangement of your colored fibers, you tack them into place with a single needle. A felting needle is very sharp and usually has either a triangular or "star" shaped cross-section. This cross section creates "blades" on the needle which have tiny barbs arranged along their length. The barbs grab the fiber and push them through the base fabric. To use the needles, you support your base fabric on a block of foam and push the needle through the fiber and base fabric into the foam pushing the loose fibers through at the same time. For this hat, I found that a "Nerf" football followed the contour of the crown of the hat better than the block foam that I had been using and I was able to work much more effectively without jabbing myself in the fingers with the needle as often as I had done with the square block.
From this point, the entire process can be done either with the single needle, or with a variety of multi-needle punches. The punches certainly make the process go much more quickly.
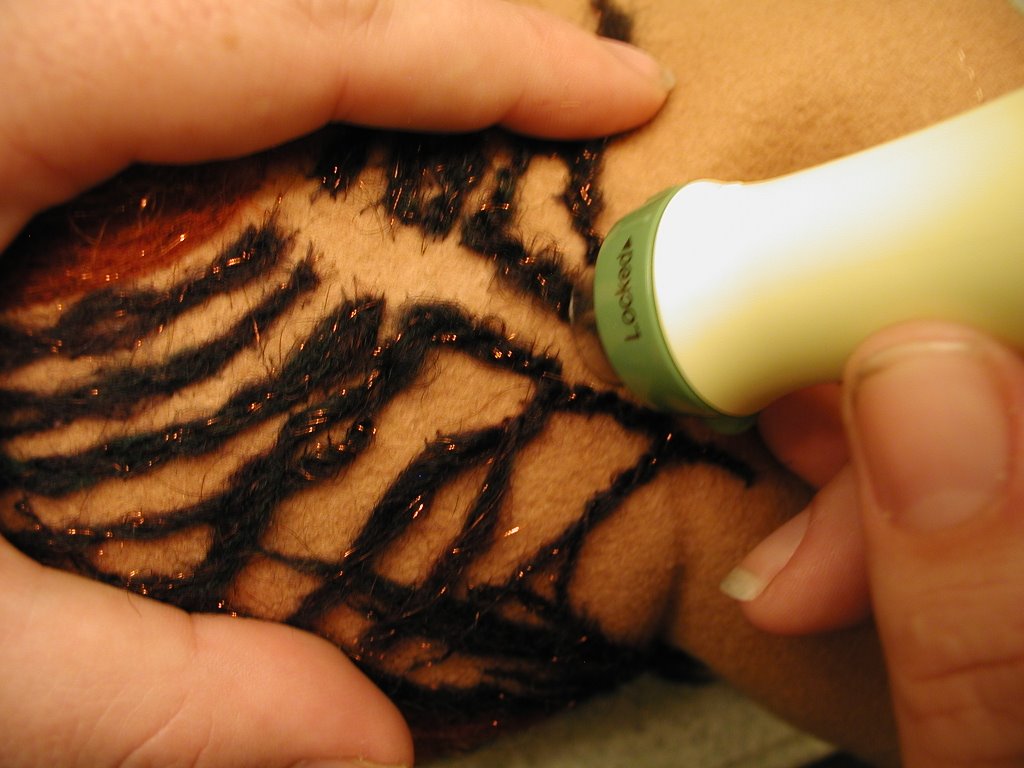 My current favorite punch is the clover multi-needle punch. It holds 5 needles and has a plastic guard which locks when the punch is not in use. The guard also protects your fingers so that you don't perforate them while you work. Once the fibers have been tacked down, the punch makes the actual work of securing the fiber to the base fabric go much, much more quickly.
12 September 2006
An' The Wheel Goes 'Round
 I mentioned in an earlier post that I'd recently learned to spin on a drop spindle. What I didn't mention was that I was also the recipient of a beautiful Country Craftsman spinning wheel. The wheel, she hasn't told me her name yet, came to me with a broken footman. After looking closely at the point of failure on the original part, I realized that it had broken at least once before in the same location and had been repaired.
The first thing that I did was to research Country Craftsman wheels in an effort to find a stock replacement. What I found was that these wheels were made by hand by a woodworker in Massachusetts for something like 25 years before he retired a couple of years ago. Needless to say, replacement parts are not exactly growing on trees.
In retrospect, I find that I'm actually glad that I wasn't able to get a stock replacement. I quickly decided that what I needed to do was to find someone to re-make the footman. I took measurements from the original, studied how it fit onto the wheel and how it worked, and took matters into my own hands. I created an Alchemy request on Etsy.
If you're not familiar with Etsy Alchemy, you're not alone. It is a system set up by the wizards at Etsy to connect buyers with artisans/craftspeople who can fulfil their makery wishes. It's also a little confusing. First, the buyer posts an alchemy request saying what they want. They include pictures or links to help clarify their needs. Then one or more Etsy artists bid to fill the request, supplying their own pictures or other information. Then the buyer chooses a bid (or several bids) and from there the commissioned work is completed, paid for, and feedback is left. It is a wonderous and magical process.
In the case of my footman, I got one bid from a woodworker in Canada who I'd corresponded with earlier this year about custom pottery tools. Barry is a great guy and the two of us exchanged quite a few messages about measurements and tweeks to the design of the original footman. In the end, he recommended a footman made of 2 layers of maple laminated together with metal plates on either side of the keyhole opening where the footman attaches to the flywheel. We changed the dimensions of the footman, as well, widening it so that the holes do not come so close to the edges as to weaken the structure of the finished part.
My new footman arrived from Canada in Saturday's mail. In the last few days, have admired it, fondled it, shown it off to my spinning mentor, and finally, attached it to my spinning wheel where it will live until the end of time. With the new footman in place, I took the wheel for a real test drive. I spun up 1/2 ounce of leaf green corriedale wool that I had purchased for a needle felting project. My thought, when I started spinning it, was that I would pull it off the bobbin and allow it to relax so that I could use it as vines for my planned needle felted embellishment. Now that it's spun, however, I can't decide whether to go with the original plan, or to ply it back on itself and save it as a momento of my first real yarn spun on my very own spinning wheel. For now, I'll leave it on the bobbin where I can admire it while I work on glazing beads for this weekend.
Expect some fun fiber posts over the next week or so... A tutorial, a long overdue explanation of my spinning fascination, more images of the large wavy motif in progress, and maybe even some yarn, assuming that I get my clay work done. Wish me luck finding the time that I'll need over the next three days.
Image: [Irish Spinner and Spinning Wheel. Co. Galway, Ireland] Found via Library of Congress online collection. REPRODUCTION NUMBER: LC-DIG-ppmsc-09892 (digital file from original) No known restrictions on publication. photomechanical print : photochrome, color. [between ca. 1890 and ca. 1900].
Subscribe to:
Posts (Atom)


